Blush might seem like a single-step, one-size-fits-all makeup item, but in reality, where you apply it — and how you apply it — can dramatically affect how your face appears. Using blush thoughtfully can lift, sculpt, soften, or balance your features according to your unique face shape. In this deep dive, we’ll explore the essential theory of blush placement, how to identify your face-shape, the best blush techniques for each shape, plus formula and tool tips to tie it all together. Get ready to elevate your glow with smart technique — because blush isn’t just colour, it’s architecture.
1. Why Face Shape Matters for Blush Placement


The Architecture of the Face
Just like architecture uses structure and lines to create form, the human face has natural contours and planes — cheekbones, jawline, temples, apple/side of cheeks, and so on. Makeup artists frequently emphasise that blush can become a “mini-contour”. According to one beauty article:
“Placing your blush under the cheekbone … can help create a more defined bone structure.”
That means that where you place blush can either lift your features, elongate the face, or conversely add fullness.
The Wrong Placement Can Work Against You
If you apply blush without considering your face shape, you might inadvertently create:
A shorter looking face
More fullness where you don’t want it
A wider appearance to the cheeks
As noted in a Reddit discussion:
“placing blush closer to the perimeter of the face helps to slim down the face … placing it nearer the middle of the face can add fullness.”
1.3 Benefit of Placement Over Just Shade
While choosing the right blush colour is important, many experts emphasise that placement is even more critical. As one beauty guide puts it:
“Blush has the power to enhance and accentuate your features … the most flattering, lifted effect often comes down to your unique bone structure and placement.”
So for our article, the focus will be mainly on placement & technique by face shape — though we’ll also cover formula and tools later on.
2. Identifying Your Face Shape


Before selecting a blush-technique, you must know your face shape. Here are the common face shapes and how to recognise them:
Common Face Shapes
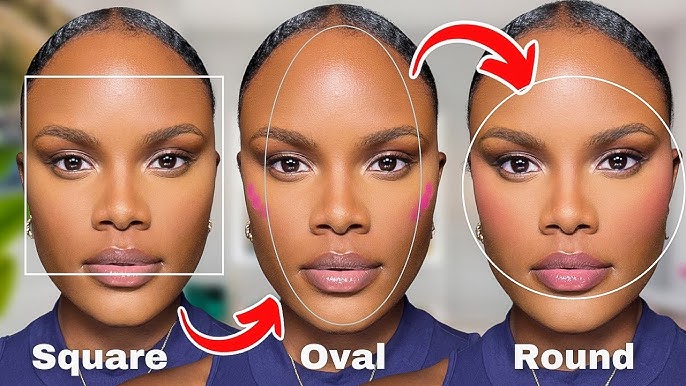
- Oval: Face is longer than it is wide. Forehead may be slightly wider than the chin; cheekbones are gently rounded. Many makeup artists regard this as “balanced”.
- Round: The width and length are similar. Cheeks may be fuller; jawline softer.
- Square: Forehead, cheeks, and jaw are about the same width. Strong jawline, angular features.
- Heart (or Inverted Triangle): Wider forehead/temple area, narrower chin. Prominent cheekbones maybe.
- Diamond: Narrow forehead and chin, wider at the cheekbones. The face may appear longer and the sides taper.
- Oblong (or Rectangular): Longer length than width; forehead, cheeks and jaw similar width but face appears longer.
2.2 How to Determine Your Shape
Here are useful tips:
- Look straight in a mirror with your hair pulled back.
- Notice where your face appears widest (temples, cheeks, jaw?).
- Observe the length of your face from hairline to chin vs width across cheekbones.
- Check jawline: is it soft/rounded or sharp/angular?
- Use a soft pencil (or your finger) to trace the outline of your face in the mirror — it helps visualise the silhouette.
Once you know your face shape, you can apply blush deliberately to enhance or balance your natural contours.
Blush Techniques for Each Face Shape
Now the main section: how to place blush for each face shape to get the most flattering effect.
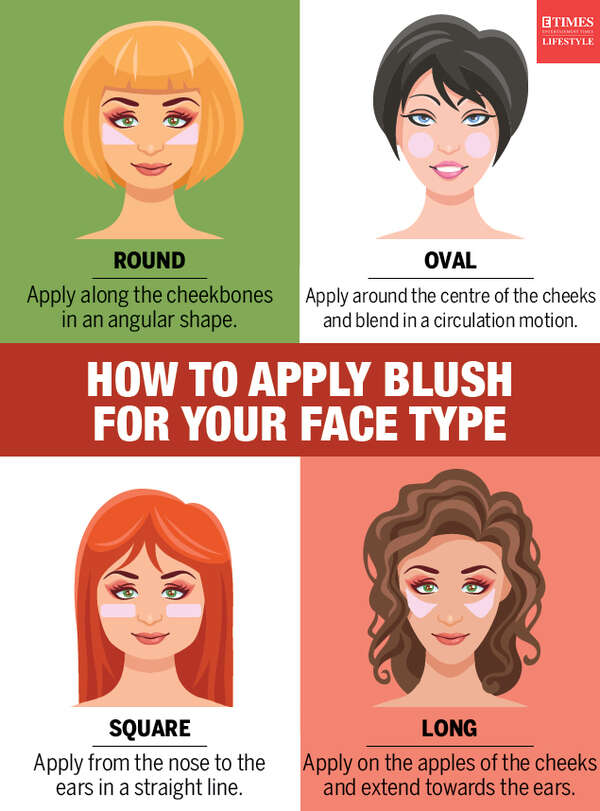
Oval Face Shape
Why it works: The oval face has balanced proportions, which means you have some flexibility. The goal: enhance the natural softness and symmetry.
Technique:
Apply blush on the apples of the cheeks (the round part when you smile gently) and then blend upward toward the temples and slightly along the cheekbones.
Avoid placing blush under the cheekbone (which is the contour zone) — it can make the face look pulled down.
For a more sculpted look, you may start slightly above the apples and sweep outwards.
Why this placement: It lifts the cheeks, highlights the natural shape, and doesn’t distort the balance of the face.
Extra tip: Because you have versatility, you can experiment with both powder and cream formulas and play with slightly higher placements for a “lifted” look or traditional apple-placement for a youthful flush.
Round Face Shape

Why it matters: With a round face, the width and length are similar, so the aim is typically to add definition / elongate the face, rather than emphasise width.
Technique:
Skip heavy blush on the apples of the cheeks. Instead, apply blush to the tops of the cheekbones, and blend outward toward the temples. This helps lift the face.
You can place slightly above the apple, more horizontally or upward. One guide calls it “slightly higher than apples”.
Use the “two-finger rule” as a guide: place two fingers beside your nose, and start blush from the zone outside that fingers step.
Avoid placing blush too low towards the cheeks or near the perimeter of the face — this may widen the appearance.
Why this works: This placement draws the eye upward and outward, creating a sense of lift and slimness rather than fullness.
Extra tip: Matte or semi-matte blush can help avoid adding too much dimension (glow or shimmer) which may emphasise roundness. Subtle highlighting of the temple or brow-bone can support the lift.
Square Face Shape

Why it matters: A square face has a strong jawline and balanced width across forehead, cheeks, and jaw. The aim is to soften the angles and bring a more rounded appearance to the cheeks.
Technique:
Focus blush on the apples of the cheeks and blend outwards toward the temples to soften angles.
Use a circular motion on the apples rather than long horizontal strokes. One expert recommends this to “add softness to the naturally strong jawline”.
You may lightly dab blush on the tip of the nose or center of the face to draw attention inward rather than down.
Avoid dragging blush too far back or low on the cheek sides, which might emphasise width.
Why this works: Concentrating colour in the centre of the face draws attention away from the strong jawlines and creates a softer, more harmonious look.
Extra tip: Use a slightly warmer blush tone to soften the structure. And blend well to avoid harsh lines which could underscore your angular features.
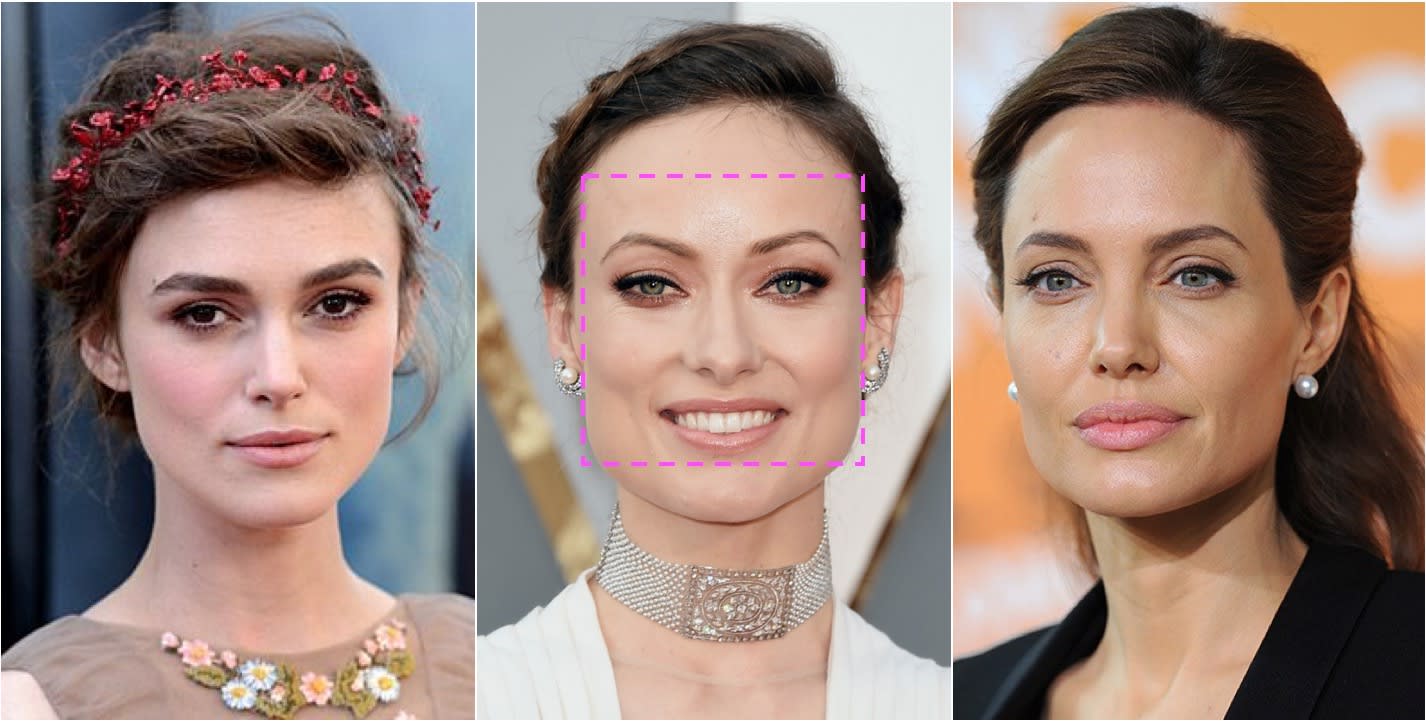
Heart-Shaped Face
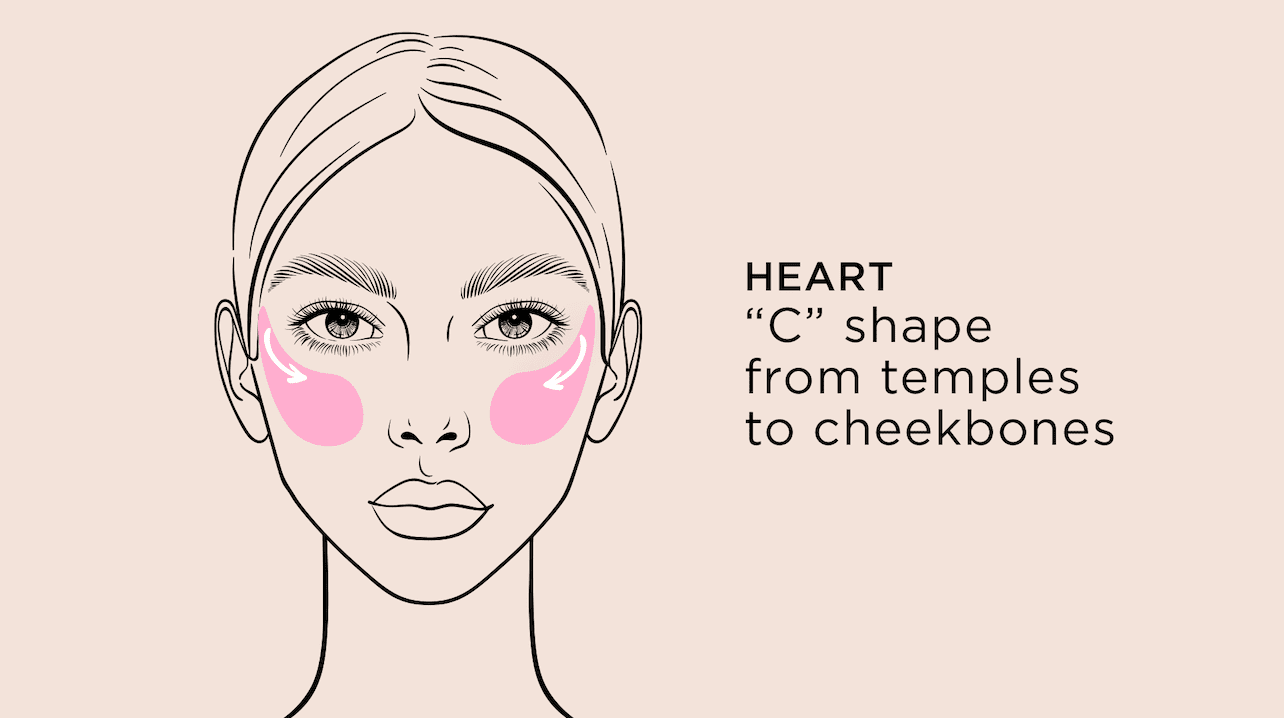
Why it matters: Heart-shaped faces have a wider temple/forehead area and a narrowed chin. You want to visually balance the lower part of the face and soften the upper portion.
Technique:
Apply blush starting just below the apples of the cheeks, then blend up along the cheekbones and toward the temples in a slight “C” shape.
Some guides suggest placing a touch of blush on the forehead’s centre or along the hairline to reduce emphasis on a wide upper face.
Avoid placing colour too low on the cheek near the jawline, as that might narrow the chin further or draw attention downward.
Why this works: The upward sweep balances the wider forehead by bringing colour toward the upper-cheek/temple area, and also draws attention away from a pointed chin.
Extra tip: A soft blush with a bit of shimmer on the cheeks can also bring light to the middle of the face, making the lower face visually stronger.
Diamond Face Shape
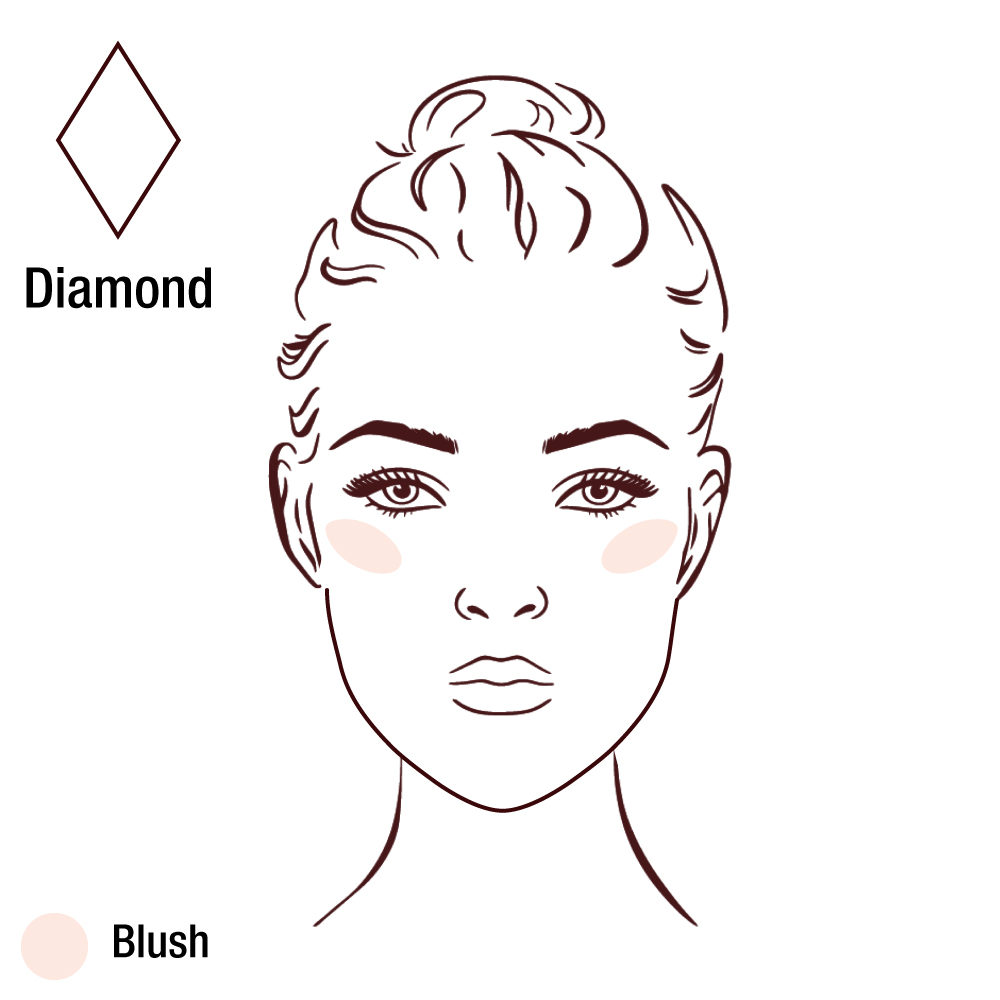
Why it matters: Diamond shapes have prominent cheekbones, a narrow forehead and chin. The aim is to accentuate the cheekbones but not overemphasise width or narrowness.
Technique:
Apply blush on the highest point of the cheekbones (the outer tops) and then softly blend out toward the ears, without pulling too far toward the temples or the mid-face.
Keep colour somewhat contained rather than sweeping deeply toward the hairline. Some guides say just “stamp” the blush and softly diffuse.
Avoid placing blush too near the centre of the face or too low under the cheekbone, which could emphasise the narrow forehead or widen the lower face.
Why this works: This placement highlights the natural width at the cheekbones (which is a hallmark of the diamond shape) while maintaining balance between upper and lower parts of the face.
Extra tip: A luminous or satin-finish blush on the cheekbones can add dimension without heavy contouring. Combine with neutral matte tones in the outer face if desired.
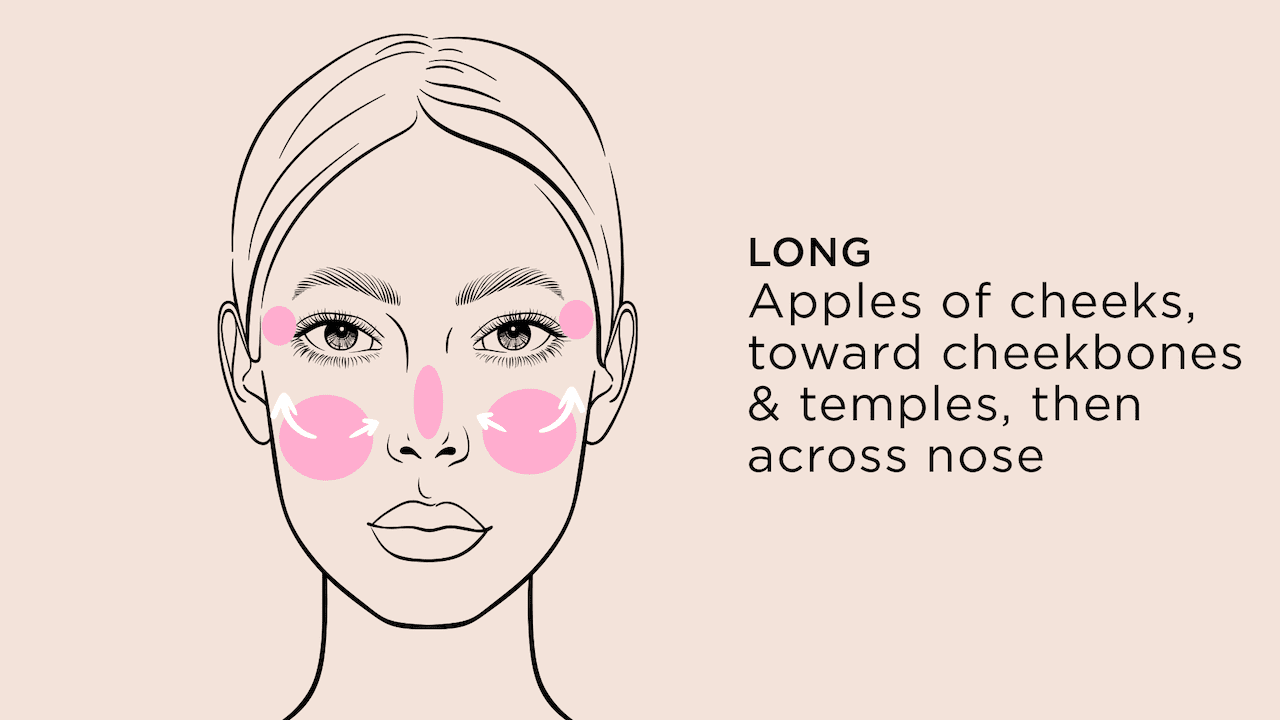
Oblong / Rectangular Face Shape

Why it matters: With oblong faces, the face is longer than it is wide. The goal: to shorten or balance the face visually and avoid drawing eyes further downward.
Technique:
Apply blush across the apples of the cheeks, blending straight outward toward the sides of the face, rather than sweeping upward. This creates a horizontal effect that doesn’t increase length.
Avoid placing blush low near the jawline or too high toward the temples, as that may elongate the face further.
You could also place some blush on the centre of the forehead or a hint on the chin to bring the visual length into balance (though subtly).
Why this works: A horizontal application gives the illusion of width rather than length, thereby making the face appear more balanced.
Extra tip: Use slightly deeper or subtle blush tones rather than extremely bright/highlights — too much brightness high up might draw the face down.
Blush Formula & Tool Tips

Switching from where to how — once you’ve chosen placement for your face shape, you’ll want your tools and formula to support that application.
Blush Format: Powder vs Cream vs Liquid
Powder Blush: Great for oily to combination skin, gives a matte or soft finish, blends easily. But may sit on top of skin texture if improperly applied.
Cream/Stick Blush: Works well for dry to normal skin, or for a dewy/luminous finish. Blends into skin more like a stain.
Liquid Blush: Sheer, buildable, great for natural flush and layering. But requires quick blending.
Some guides note: placement effect is more important than formula — you can use any type of blush, as long as you place it right.
Undertones & Shades (Touch-On but Not the Main Focus)
While this article is about placement, a quick note:
Warm skin tones tend to suit peachy, coral, warm rose blushes.
Cool skin tones go well with mauve, berry, cool pink.
Neutral skin tones can often pull either.
An article from Patrick Ta mentions: placement comes first, then fade of colour.
Brush / Tool Selection
A blush brush should be soft, rounded (or angled for precision) and suited to your face size — smaller faces might want a more compact brush.
For creams or liquids: use fingers or a dense brush or a sponge for better blending.
Blending is key: harsh edges will conflict with the natural “flushed” look you’re aiming for.
Application Tips
Start light: Build gradually. You can always add more, but it’s harder to remove too much blush.
Tap off excess powder if using powder blush.
Blend out edges — no harsh lines.
Avoid smiling too much when applying — smiling lifts the apples too high, so when you relax the face, the blush drops and may sit in an unnatural place. One expert says this is a common mistake.
Try applying in natural daylight to check placement and blending.
Common Mistakes & How to Fix Them
Mistake 1: Too Low on the Face
Placing blush under the cheekbones or too low on the cheeks can drag the face down and widen appearance. One Newsweek article emphasised:
“Applying the blush on top of the cheek bone … created a more slender look, whereas placing it in the centre/lower part made the face appear fuller.”
Fix: Raise the blush placement. For most shapes (round, oval, diamond) you’ll benefit from higher or more lateral placement rather than low.
Mistake 2: Over-Smiling While Applying
When you apply blush while smiling broadly, you’re basically painting the cheeks at their highest position. Once you relax, those placements drop to a less flattering part of the face. Makeup artist Wayne Goss warns this can age the face.
Fix: Keep your face relaxed during application; use fingers to gently pose the skin if needed without full smiling.
Mistake 3: Ignoring Face Shape & Using One Universal Placement
Many people simply “smile and put blush on apples” but that may not suit their shape. According to a guide:
“The ‘two-finger’ rule may not work for everyone — applying blush according to your face shape remains the best way.”
Fix: Take time to identify your shape and follow the tailored placement. Use a mirror and good lighting to check.
Mistake 4: Harsh Lines or Unblended Edges
Blush with visible edges or harsh boundaries can look unnatural and draw attention to the wrong area (or highlight texture).
Fix: Use a clean blending brush to soften edges. You can also lightly sweep a clean translucent powder or skin-tone powder around the blush edges to soften.
Mistake 5: Wrong Shade or Too Much Sheen
While not the main focus here, using a super-bright or overly shimmery blush can accentuate problem areas (e.g., cheeks on a round face).
Fix: For structural face shapes (round, oblong), consider more matte or subtle sheen blushes. Gloss or high shimmer can be saved for the high points only (cheekbone tops).
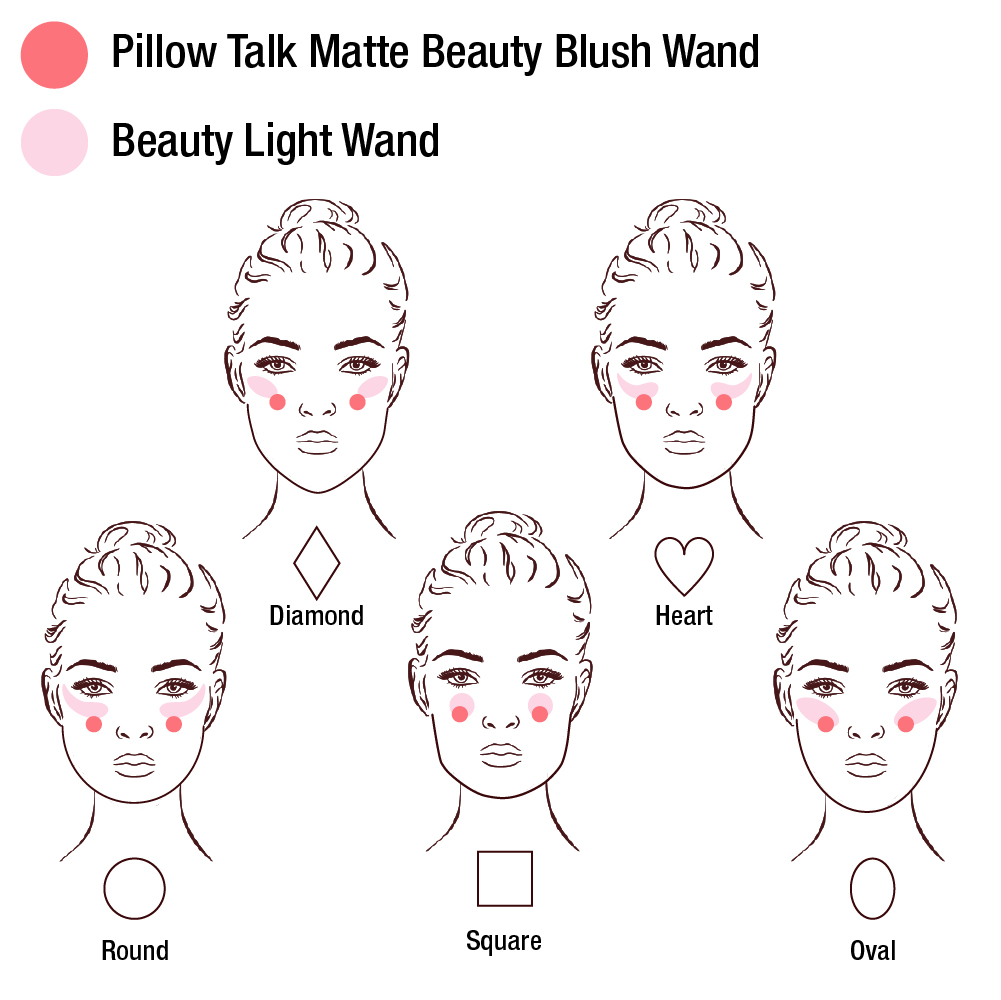
Rapid Reference Guide: Face Shape & Blush Placement Summary
| Face Shape | Blush Placement | Purpose | Key Tip |
|---|---|---|---|
| Oval | Apples → cheekbones outward/up | Enhance natural balance | Avoid low under cheekbone placement |
| Round | Tops of cheekbones → temples | Lift & elongate | Skip the low apples placement |
| Square | Apples of cheeks → blend to temples | Soften angles | Use circular motion; avoid USUAL broad stroke |
| Heart | Just under apples → C-shape upward to temples | Balance wide forehead & narrow chin | Add touch to centre of forehead if desired |
| Diamond | Highest point of cheekbones → outward towards ears (not too far) | Accentuate cheekbones & maintain balance | Stamp then diffuse lightly |
| Oblong/Rectangular | Apples of cheeks → straight outward horizontally | Shorten look & add width | Avoid upward strokes that elongate face |
How to Choose & Wear Blush Based on Occasion and Lighting
Daytime / Natural Light
- Opt for softly blended colour to look natural — placement matters more than “boldness”.
- In daylight, check that the blush is blended into your skin, not “sitting on top”.
Evening / Artificial Light
- You can afford slightly stronger colour or more sheen because lighting is harsher.
- However — placement still matters. Don’t compensate for lighting by placing blush wrong.
Photos / Flash
- Cream or liquid blushes often translate better in photos because they blend more seamlessly into skin.
- Powder blush can be used, but check it doesn’t appear patchy. For all face shapes, heavy texture will be visible.
Season or Trend Adjustments
- For a summer glow, you might extend a little blush toward the nose bridge or temples (especially for oval/round shapes) for a “sun-kissed” look.
- For winter/dry skin, use a cream formula with placement higher up to keep the face from looking flat.
Tailoring Additional Techiques & Considerations
Skin Texture & Age
As skin matures, cheeks may lose some fullness. For older skin:
- Avoid placing blush too low (can emphasise sag or jowls).
- Blend blush upward and maybe closer to temple or cheekbone top for lift effect.
- Sheen or subtle luminiser can complement blush, but placement remains key.
Ethnic & Cultural Variations
Different face shapes can appear in all ethnicities; also lighting, undertone, and face features vary. The placement rules remain a guide — adjust to your unique structure. For example, fuller cheeks (common in younger faces or certain ethnicities) may benefit from brush placement slightly higher to give lift. A Reddit user said:
“I find this method doesn’t actually work for many people… the age-old blush trick is to smile… but for lots of faces you need different placement.”
Combining Blush With Other Face Makeup
- Contour: If you’re using contouring, be sure blush doesn’t overlap aggressively with the contour zone (under cheekbone) unless you’re purposely doing a draping or trend look.
- Highlighter: Highlighter on the cheekbones can complement blush — just ensure different products aren’t fighting each other. Placement should still respect shape.
- Bronzer: If you use bronzer, often applied around the periphery, then keep blush more central/structured as appropriate.
Trends vs Fundamentals
Beauty trends (e.g., “boyfriend blush”, “draping”, “sunburn blush”) may alter placement deliberately, but the fundamentals of face-shape still apply. For example:
The “boyfriend blush” trend places colour across apples and down jawline for a playful, flushed look — great on oval/oblong, but maybe too much for round or square faces.
Draping uses blush as contour and highlight together — effective, but only when you understand your bone structure and placement.
So: feel free to experiment, but know the architecture behind your face first.
Real-Life Step-By-Step: Example Applications
Here are two full step-by-step routines to demonstrate the concept:
Example 1: Round Face – Soft Lift
- Prep your face with foundation/skin base so your skin tone is even.
- Choose a blush with semi-matte finish (colour depending on your undertone).
- Identify the top of your cheekbones (below the outer corner of the eye) — this will be your starting point.
- Using a blush brush, pick up product, tap off excess.
- Place the brush at that point and sweep outward toward the temples, blending slightly upward, rather than straight across cheeks.
- Check in mirror with your face relaxed; if necessary, blend a little near temples or hairline to soften.
- If you feel the face still looks full, you might use a little translucent powder under the cheekbone (not over blush) to create more lift.
- Finish with lips/eyes. Check in natural light for uniform blending.
Example 2: Heart Face – Balancing Upper & Lower
- After base makeup, pick a cheeks-appropriate blush (a warm rose or soft peach often works for many).
- Locate just under the apples of the cheeks (a little lower than the traditional smiling apple).
- Using your brush, apply colour there, then blend in a “C” shape upward toward the temples / hairline slightly, following the cheekbone line.
- Optionally, add a tiny bit of blush (or a sheer wash) on the centre of the forehead near the hairline and/or a whisper on the chin to bring visual balance (since heart shape has narrow chin).
- Keep blending edges so there aren’t hard lines. Maybe use a clean fluffy brush to soften.
- Review in natural light: ensure the cheeks are flushed but the colour doesn’t extend too low toward the jaw-line.
Building Your Blush Routine for Your Face Shape
Here’s a small checklist to help you implement this into your daily makeup routine:
- Identify your face shape (oval / round / square / heart / diamond / oblong)
- Choose your desired finish (matte, satin, luminous) based on skin type & age
- Select blush format (powder, cream, liquid) that suits your skin and routine
- Determine your placement zone following the guide above
- Use the correct brush or application tool
- Start light, build colour gradually
- Blend edges thoroughly
- Check the effect in natural light
- Adjust if necessary (less colour, blend more outward/upward)
- Maintain your tools (clean brushes, refresh product)
Blush is more than just a finishing touch — when placed with intention, it becomes a tool of facial architecture. Whether you have a round face and want lift, a square face and want softness, or a heart-shaped face seeking balance, the correct blush placement will help you meet your goal.
Remember:
- Replace “one technique fits all” with “placement fits you”.
- Placement ➜ effect.
- Shade/format matter, but only after you’ve got the correct zone.
- Blending is essential.
- Experimentation is okay — once you know your base architecture, you can play with trends safely.
So next time you pick up your blush brush, don’t just ask which colour — ask where it should go and why. Your face shape is your makeup roadmap.
Here’s to beautifully-placed blush and a face that glows in structure, not just in colour.
#BlushTechnique #FaceShapeMakeup #MakeupTips #BlushPlacement #BeautyArchitecture #BlushTutorial #MakeupRoutine #CheekGlow